
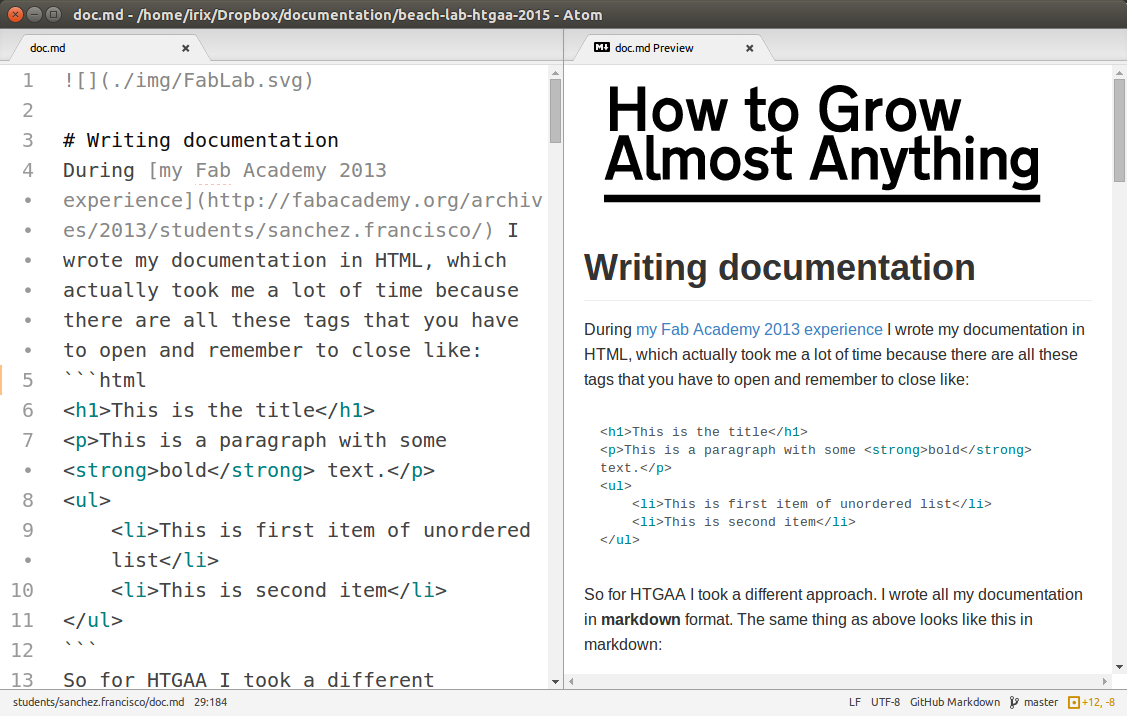
During my Fab Academy 2013 experience I wrote my documentation in HTML, which actually took me a lot of time because there are all these tags that you have to open and remember to close like:
<h1>This is the title</h1>
<p>This is a paragraph with some <strong>bold</strong> text.</p>
<ul>
    <li>This is first item of unordered list</li>
    <li>This is second item</li>
</ul>
So for HTGAA I took a different approach. I wrote all my documentation in markdown format. The same thing as above looks like this in markdown:
# This is the title
This is a paragraph with some **bold** text.
* This is first item of unordered list
* This is second item
Here's how I did it, just in case you want to replicate.
Markdown is a rising tendence when it comes to write documentation because it is very easy to write, very easy to read and you can also easily export to HTML and other formats. In markdown you focus more in the content and much less in code tags which are prone to syntax errors.
A Markdown document is just a plain text file usually appended with a .md extension. It will only take you about 10 minutes to learn the basics following this tutorial.
The process of writing the documentation involves typing the documentation in markdown, exporting to HTML using pandoc with a css template, and pushing the documentation to github. You can do all of these things manually but I automated them in a shell script.
An alternative workflow would be using an online tool like Stackedit.io. This is not described here, but is it worth having a look at it.
The following instructions are valid for Ubuntu. If you have Windows or Mac OS X operating systems these could be different or even not work at all.
You first need a text editor. I use Atom because it is Open Source and also has built in markdown preview. To activate the markdown preview in Atom clic on Packages/Markdown Preview/Toggle Preview.
To convert .md files to .html files you need I use a command line tool called pandoc. In Ubuntu you can install pandoc by typing this in the terminal:
sudo apt-get install pandoc
When you export to HTML, by default pandoc will export it unstyled, just like a normal HTML file written from scratch. But you can style your HTML using CSS. Styling HTML is recommended not only because it looks nicer but also because styling can make it easier and more pleasant to read. Which I consider an important feature for the documentation. Instead of writing your own css file from scratch, what I recommend is modifying one of the many available css files for pandoc, or use the one I use.
Some tips learned the hard way
Standard markdown syntax does not require a blank line before a header. Pandoc does require this (except, of course, at the beginning of the document). The reason for the requirement is that it is all too easy for a # to end up at the beginning of a line by accident (perhaps through line wrapping).
If you need a hard line break, put two or more spaces at the end of a line.
Some people tells me why I keep using command line tools like pandoc. It is because I consider automation the real power of comand line tools. You want to automate because you are lazy bastard like me, admit it in order to avoid typing all these commands in terminal over and over and also in order to speed up the process of file conversion and uploading to the server.
All you need to do is to create a new plain text file and name it something like auto.sh (for shell script) where you will write a sequence of commands. Those will be the very same commands that you would type in the terminal one by one.
This tutorial assumes that you have all the markdown .md and css .css files together in the root of your student folder - which is inside the lab folder containing the github repository. Otherwise just adjust the paths accordingly. The contents of the auto.sh file should be similar to this:
# Automation file
# Step 1. File conversion from .md to .html
FILES=*.md
for f in $FILES
do
  # extension="${f##*.}"
  filename="${f%.*}"
  echo "Converting $f to $filename.html"
  `pandoc -s -c base.css $f -t html -o $filename.html`
done
# Step 2. Uploading everything to github
# If there is commit message then upload
if [ "$#" -gt 0 ]
then
    cd .. # Now in students folder
    cd .. # Now in lab folder
    git pull
    git add --all
    git commit -m "$*"
    git push
else
    echo "Not uploading (Empty commit message)"
fi
Please note that the git commit line contains a $*. This is important since we will pass the commit message as an argument when we execute the script. Now it comes the easy part. After you type all your documentation you open a new terminal inside your student folder that contains auto.sh file and type:
sh auto.sh
And it search for all the .md files in your folder and will convert them to HTML, overwriting if they already existed. But if you also write a commit message like this:
sh auto.sh this will be the commit message
This will convert all the markdown documentation to HTML and upload the documentation to your repository.
Finally remember that my documentation is open source, under the WTFPL license, so you can clone it, fork it and modify it as you like. I'm just asking for a miserable link to my page in your credits section.
Finally if you make several million dollars with all the things I share, consider inviting me to one of your private jet parties in the middle of the Ocean full of DJ's, drinks and so.